Frequently Asked Questions
Click here to access the Ed Tech Support Workflow guide.
Click on one of the questions below to show its answer.
You can access Blackboard Learn using any of the below options:
1. By directly typing Blackboard Learn URL (http://mylearn.hct.ac.ae) in a browser.
2. Access HCT Portal (http://portal.hct.ac.ae), click on “Blackboard Learn” icon from the Application Shortcuts.
Yes, you can access Blackboard Learn in your mobile devices using any of the below options:
1. By directly typing Blackboard Learn URL (http://mylearn.hct.ac.ae) in any of the mobile browser.
Please note: Blackboard does not support the default browser on some mobile devices, such as the iPad. For a list of supported browsers and operating systems, see Browser Support.
2. Access HCT Portal (http://portal.hct.ac.ae), click on “Blackboard Learn” icon from the Application Shortcuts.
3. Using Mobile Learn App downloaded from the App Store on your mobile device. For more information about Blackboard Mobile Learn, see the Blackboard Mobile Overview.
Blackboard Learn is integrated with the HCT’s Active Directory.
If you are accessing Blackboard Learn with the direct URL (http://mylearn.hct.ac.ae), use your Active Directory Username and Password (which is the same username and password you used to login to the HCT Portal)
If you are accessing Blackboard Learn using the Application Shortcut “Blackboard Learn” from the HCT Portal ((http://portal.hct.ac.ae), as it is Single Sign On enabled, it will directly let you login to Blackboard Learn without asking any Username/Password.
Follow the below steps to Access “Mobile Learn” App from your mobile device:
1. Tap on “Mobile Learn” App
2. Search for your school by typing “Higher Colleges of Technology”
3. “Higher College of Technology” will be listed on the searched list, tap on it.
4. Use your Active Directory Username and Password to login into Mobile Learn App (which is the same username and password you used to login to the HCT Portal)
The username is not case sensitive. However, the password is case sensitive.
Yes, Blackboard is accessible from any computer with Internet access, whether you are on campus or at home.
Students – If you’re not sure how to contact them, check with your instructor or search for Edtech HelpDesk on your campus website or portal.
If you get this error message, try accessing Blackboard Learn from the Portal Application Shortcut and see if you are able to access Blackboard Learn.
If may still not able to access Blackboard Learn and may receive “Access Denied” error, in such case please contact Edtech Help Desk at your Campus with your username and error screen shot.
Students – If you’re not sure how to contact them, check with your instructor or search for Edtech HelpDesk on your campus website or portal.
Click the below link which ever is appropriate based on your role to find more help on Blackboard Learn: You can access a comprehensive list of FAQs on Blackboard Mobile Learn from the Mobile Learn FAQ site. Mobile Central: A suite of applications, branded as your own campus, that engages campus users in a powerful way by bringing faculty and students their entire campus community and services to the mobile devices they use. Mobile Learn: Allows students and educators to access teaching and learning wherever and whenever they want through two-way interactions on mobile devices. Mobile Learn extends and enriches the course experience of the Blackboard Learn™ online teaching and learning platform in native mobile applications for the most popular mobile platforms – including Android, BlackBerry, iPhone OS, iPad, and soon the Mobile Web. NOTE: Higher Colleges of Technology is currently licensed to use ONLY the Mobile Learn component of Blackboard’s Mobile Solutions.
Access
First, make sure that you have not hidden your courses from the Course List display in Blackboard Learn. Once you have logged in to your Blackboard Learn environment, click the gear icon at the top right of the course list. Uncheck the box to ‘Unselect All’. That will hide/show the course from your course list view. If the courses not hidden from your course list, then continue below steps. Blackboard Learn is tightly integrated with the institution’s enterprise Student Information System (Banner). Course enrolments are handled through Banner at HCT. Students enrolled in Banner section/s will automatically get enrolled into their equivalent Blackboard course. If any of your sections are missing from your Blackboard Learn course list, please ensure you are enrolled in the appropriate Banner sections. If your enrolment is correct in Banner and incorrect in Blackboard, contact your course instructor who may be able to assist you in this regard by coordinating with your campus Edtech Helpdesk. If your enrolments are incorrect in Banner then you need to enrol yourself in the respective Banner sections, contact your course instructor who may be able to assist you in this regard by coordinating with your campus Academic Services.
Usage
Review Blackboard’s On-Demand Tutorials:
Upon accessing Mylearn’s login page, you will see any possible system-wide announcements below the username and password fields.
This announcement is to inform all Mylearn users in advance about the downtime for the server, important updates, enhancements, tips, etc.
After you log into MyLearn, you can find the courses listed under “My Courses” module under “My Institution” page.
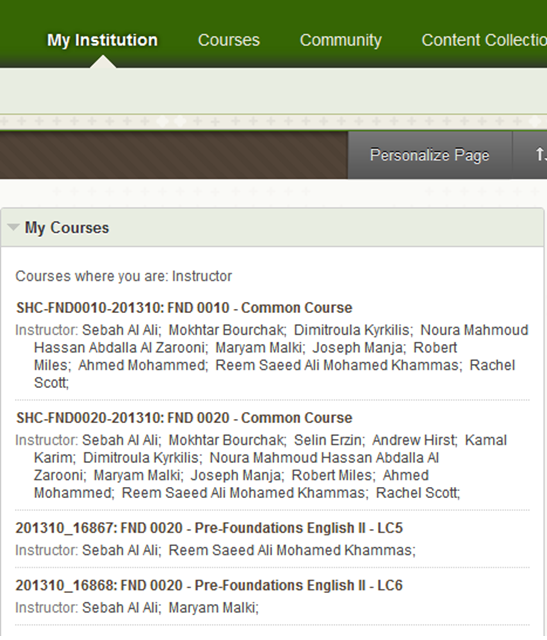
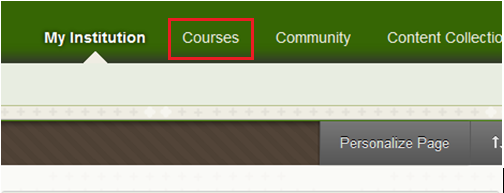
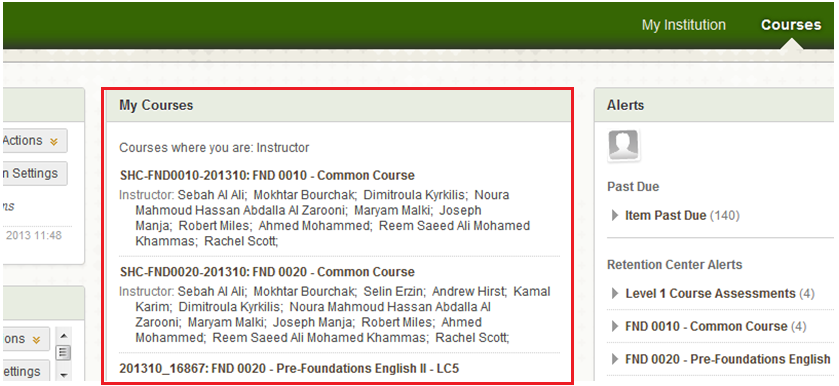
Or you can click on “Courses” tab on the top, and view your courses under “My Courses” Module.
You can customize the courses that are viewed in this list by clicking on the gear icon that will appear once you hover the mouse over the title.

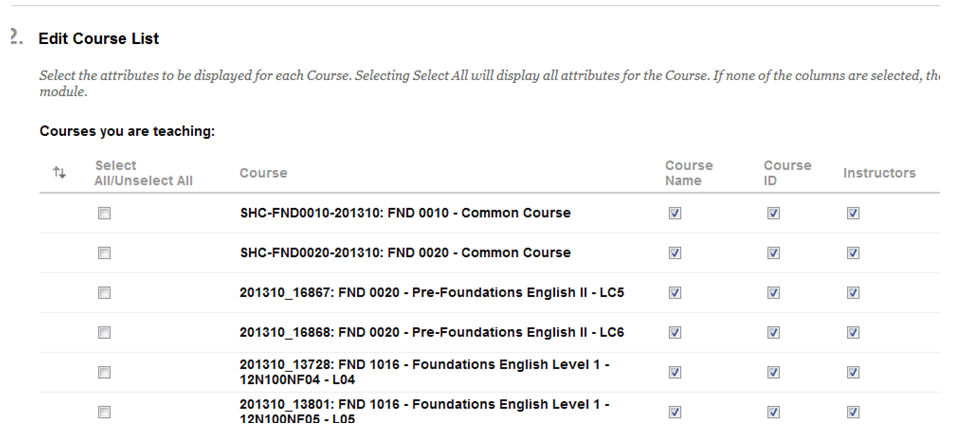
Remember to submit changes once you’re done.
Blackboard includes spell check in the Content Editor.
There is a Blackboard Help for Students website. Also, refer students to On Demand Learning Center: For Students.
Pop-up blockers are used to prevent annoying advertising that “pops up” on a computer screen when using the Internet. However, if pop-up blocking is enabled for Blackboard, you may be unable to view discussion postings, take exams, and/or download files.
- Mozilla Firefox Pop-up Blocker Information – See instructions for disabling Pop-up Blocker
- If you block pop-ups, be sure to add http://mylearn.hct.ac.ae as an “allowed site.”
- Internet Explorer Pop-up Blocker information – See instructions for allowing pop-ups from specific websites
- If you block pop-ups, be sure to add http://mylearn.hct.ac.ae as an “website to allow.”
Additionally, if you are using anti-virus, internet security, or personal firewall software to control or eliminate pop-up windows, those applications can interfere with Blackboard.
Access
First, make sure that you have not hidden your courses from the Course List display in Blackboard Learn. Once you have logged in to your Blackboard Learn environment, click the gear icon at the top right of the course list. Uncheck the box to ‘Unselect All’. That will hide/show the course from your course list view. If the courses not hidden from your course list, then continue below steps.
Blackboard Learn is tightly integrated with the institution’s enterprise Student Information System (Banner). Course enrolments are handled through Banner at HCT. Instructors enrolled in the Banner section will automatically get enrolled into the equivalent Blackboard course. If any of your section/s are missing from your Blackboard Learn course list, please ensure you are enrolled in the appropriate Banner sections.
If your enrolments are correct in Banner and incorrect in Blackboard, contact your your campus Edtech Helpdesk.
If your enrolments are incorrect in Banner then you need to enrol yourself in the respective Banner sections, contact your campus Academic Services.
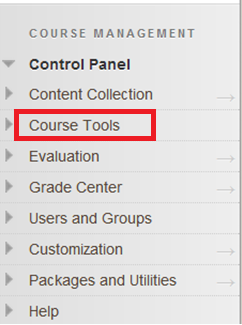
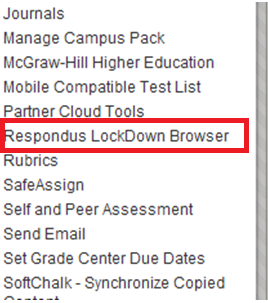
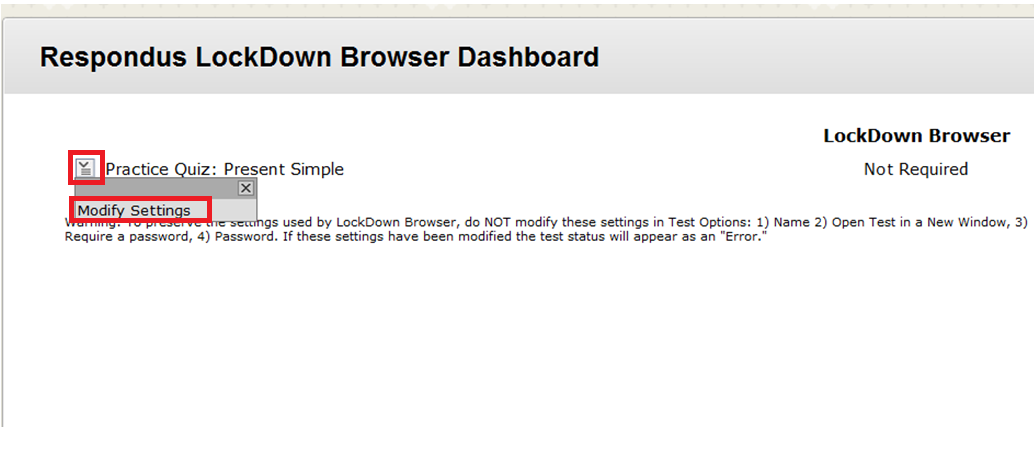
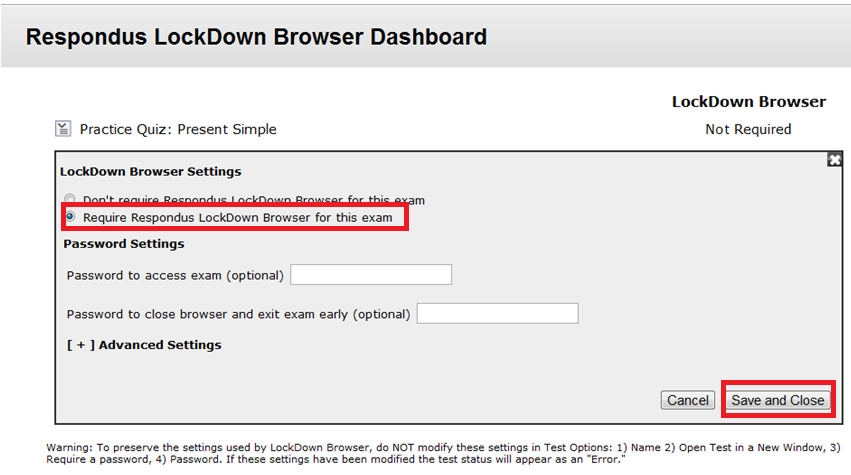
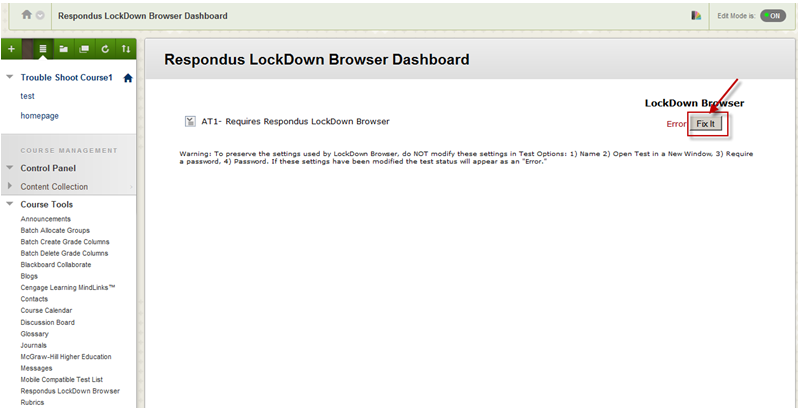
Yes, Blackboard is committed to ensuring that the platform is usable and accessible. The code and user interface design techniques are continually audited to ensure that the application is usable by everyone, to the greatest extent possible, regardless of age, ability, or situation. For more information, see: Accessibility Improvements. The Blackboard Learning Management System is accessible to users with disabilities when used with the appropriate assistive technology. Blackboard’s statement on Accessibility can be reviewed on their website. The instructor also has responsibilities in ensuring that their course materials can be accessed by users with disabilities. If you would like guidance in building courses that are accessible or learning more about technology and accessibility, you may request enrolment in Blackboard’s free self-paced course Universal Design and Accessibility for Online Learning available through CourseSites. Click on the course name and request enrolment. Though some of the material is dated, other considerations for developing course materials can be found at the University of North Carolina’s website: Tips for Using Blackboard with JAWS Upon accessing MyLearn’s login page, you will see any possible system-wide announcements below the username and password fields. These announcements are posted to inform all MyLearn users in advance about any possible downtimes for the server, important updates, enhancements, or important tips, etc. After you log into MyLearn, you can find the courses listed under “My Courses” module on the homepage. Or you can click on “My Courses” tab on top, and view your courses in a separate page. You can customize the courses that are viewed in this list by clicking on the gear icon that will appear once you hover the mouse over the title. Remember to submit changes once you’re done. Review Blackboard’s On-Demand Tutorials: Blackboard includes spell check in the Content Editor. It’s a great idea to store course files such as syllabi, PowerPoint presentations and course handouts in Blackboard. The big advantage is that students enrolled in your course can access the files from any internet connected computer. Follow the instructions in this video, Adding Files to Course Files, to upload files to Blackboard. Then watch Attach Files from Course Files to see how the files can be made available to students. If you have HTML files in a folder and want to keep the file structure intact, please view this video, Add File to Deploy HTML Package All students are automatically enrolled from our student system. Students use the Course Menu to navigate to course content, tools, and external links. To Customize the Course Menu: For more details, review this information: First, make sure that the student has not hidden his/her course from the Course List display in Blackboard Learn. Once they have logged in to their Blackboard Learn environment, click the gear icon at the top right of the course list. Uncheck the box to ‘Unselect All’. That will hide/show the course from their course list view. If the courses are not hidden from their course list, then follow the steps below: Blackboard Learn is tightly integrated with the institution’s enterprise Student Information System (Banner). Course enrolments are handled through Banner at HCT. Students enrolled in Banner section/s will automatically get enrolled into their equivalent Blackboard course. If any of your sections are missing from your Blackboard Learn course list, please ensure you are enrolled in the appropriate Banner sections. If your student’s enrolment is correct in Banner and incorrect in Blackboard, contact your campus Edtech Helpdesk. If your student’s enrolment is incorrect in Banner then they need to be enrolled in the respective Banner section. In this case, you will need to contact your campus Academic Services. The student’s view of the course is essentially same as yours when the Edit Mode is Off, except that you have access to theControl Panel on the bottom left (below the Course Menu). Students can view My Grades; instructors have no personal grades to view. The Retention Center provides an easy way for instructors to discover which students in their courses are at risk. Instructors can communicate with struggling students and help them take immediate action for improvement. Instructors can also see the date of last access in the Grade Center and can also view student activity using Course Statistics. Instructors can also use the Performance Dashboard (video). Instructors can not only see the date of last access, but also view information about the student’s Discussion posts and Review status. You can run several types of Course Reports to view information about course usage and activity. You can view summaries of course usage including which course areas are used most frequently and course access patterns for specific students. Watch how to run one of the reports, Overall Summary of User Activity Report. There are assessment features that allows creation of … See Tests, Pools, and Surveys for more information. To preserve the settings used by LockDown Browser, do NOT modify these settings in Test Options: Eg: 1) Name 2) Open Test in a New Window, 3) Require a password, 4) Password. If you still need to modify the settings, the test status will appear as an “Error” under the respective quiz displayed under Course Tools -> Respondus Lockdown Browser. Click “Fix it” to fix the error. You can use the assignment tool to send and receive documents. You can also use blogs, journals, wikis, and the discussion board to collect homework assignments. SafeAssign compares submitted assignments against a set of academic papers to identify areas of overlap between the submitted assignment and existing works. Safe Assign is used to prevent plagiarism and to create opportunities to help students identify how to properly attribute sources rather than paraphrase. SafeAssign is effective as both a deterrent and an educational tool. To learn more about SafeAssign, go to: Using SafeAssign (video) No, Blackboard will not allow submitting more than one assignment in the same Draft-SafeAssign. If you want to allow students to submit multiple uploads, you should go to the grade center and remove any previously uploaded documents for that student. Occasionally, with a course copy or import, some of the content tools get turned off. Follow the instructions below to restore them to the tool menu. This process is also shown in this video: Turning Tool Availability On and Off. It is recommended that instructors download grades periodically during the course. It’s also a good idea to download the grade center at the end of the term so you can keep a permanent copy of the grades for your records. Some divisions require instructors to send a copy of the Grade Center. See this video for step-by-step instructions: Download Grades To download the Grade Center: Providing the class average for each column in the Grade Center can be misleading to students especially in an online course when students complete work at different times. To remove the class average from the display: This process will remove the statistical information in My Grades. When using Blackboard, teachers have files in two places, the Content System and their desktop, which could cause confusion. Through Bb Drive, teachers can quickly make changes and see those changes in their courses immediately. You can find more information here: http://www.blackboard.com/Platforms/Learn/Products/Blackboard-Learn/Teaching-and-Learning/Expanding-Learn/Content-Management/Blackboard-Drive.aspx Almost any type of file can be uploaded to Blackboard including Word, PowerPoint, html, PDF, plain text, rtf, audio and video files. If large audio or video files (longer than 3 minutes) are being used, please contact the computing help desk at your HCT College Campus who will assist in this matter. Also, consider using the Mashup tool: Creating a Mashup. File names can NOT contain any special characters including (but not limited to): # $ & % ! { } [ ] ( ) / Acceptable file names include upper and lower case letters, numbers, hyphens and underscores only (A-Z, a-z, 0-9, -, _ ). Due to current Blackboard functionality, the file name must be under 72 characters long. File names that are over that length will be accepted by Blackboard, but errors will be encountered when the instructor attempts to download them for grading. For best results, please do not use spaces in your file names. Yes, you can upload these files into content areas that you might create such as Course Information, Assignments or Course Documents. See Tour the Course Files Feature. Watch Attaching a Syllabus to learn how to post your syllabus as an attachment in your Blackboard course. An advanced feature in Blackboard is the ability to establish either a Graded Discussion Forum or a Graded Discussion Thread. This allows instructors to review student responses within the forum and to also assign a grade. The grade is then automatically transferred to a corresponding column within the Grade Center. When course materials containing discussion materials are copied (or exported/imported) to another course, the Forums and any threads in the forum threads are copied to the new course. The author information for the threads is not copied over, so Blackboard assigns “Anonymous” as the author to each thread. In most cases, the instructor plans to remove the threads in the new course anyway, so this designation of “Anonymous” is not a problem. However, some discussion boards are setup with an initial “starter” thread to direct the discussion. The instructor may wish to retain this starter thread for the new course but prefers that the author be displayed as their own posting and not from “Anonymous.” If the starter thread is needed, and the author is “Anonymous,” the instructor can easily change the author. Make sure to view the forum in “List view” (option right below the Edit Mode). Mouse over the chevron next to the thread title and choose Change Author. The thread will immediately change to the instructor’s name. Be sure to remove any old posts that are not needed. Don’t leave them for your students to click through. Even though the student’s names have been changed to “Anonymous,” the posts themselves may contain names or other personal information. After copying or importing a course, Delete Old Discussion Posts: On the next screen, a confirmation message appears in the green bar at the top of the page. Return to the main page of the Discussion Board. Repeat for every discussion forum. Yes, it is highly recommended that you regularly create a backup of your entire course using the “Export Course” function. The Export function creates a zip file that you should save to your hard drive for safe-keeping. Don’t try to edit the zip file. By making regular back-ups after editing your course, you will always have a current copy of your course. If needed, you can then use the “Import Package” option to bring the course content back into Blackboard. The Archive Course option creates a zip file that can be used as a back-up file. It contains all the content and user interactions including course work submissions, discussion messages and scores in the Grade Center. When an archived course is restored, a complete course as of the time the archive was made will be created. The Restore operation can only be done by a Blackboard administrator. Please contact the Helpdesk for assistance if you need to restore an archived course. Pop-up blockers are used to prevent annoying advertising that “pops up” on a computer screen when using the Internet. However, if pop-up blocking is enabled for Blackboard, you may be unable to view discussion postings, take exams, and/or download files. Additionally, if you are using anti-virus, internet security, or personal firewall software to control or eliminate pop-up windows, those applications can interfere with Blackboard.
Usage
Course-Related
Student Access
Assessment
1. Assignments
2. Surveys
3. Quizzes/Tests
Other
https://files.blackboard.com/users/jporter/Blackboard_Drive_1.5.14490_mac.zip
https://files.blackboard.com/users/jporter/BlackboardDrive-x64_1.5.14491.zip
https://files.blackboard.com/users/jporter/BlackboardDrive-x86_1.5.14491.zip
Copying or Exporting/Importing Course Materials Containing Graded Discussion Forums/Threads
Removing “Anonymous” as the Author
Remove Old Messages
Teachers, please note: The latest version of the assessment instructions for Faculty Wide Foundation Assessments can be found on the Foundations SharePoint site here.
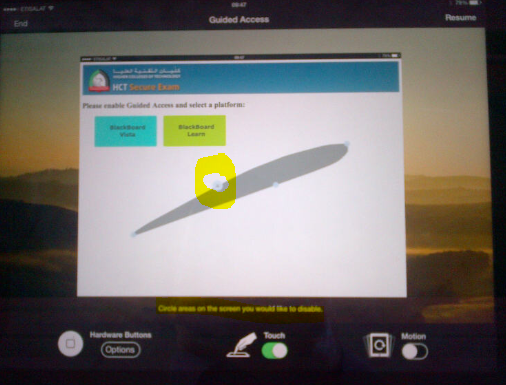
Pre-Foundations 1 and Levels 1, 2 and 3 will have their VGR tests delivered on the iPad, in BBLearn, using the HCT Assess app, with Guided Access enabled. You can find the setup instructions on our Sharepoint site.
They should be ON, since the Writing is not being done on the iPad this semester.
No, there is no longer an option to disable all hardware buttons, and the motion bug that affected Guided Access in iOS 6 has been fixed in iOS 7.
You might not see the setup screen if you have previously used Guided Access with a given app. Instead Guided Access just starts without giving you any message. Tap the Home button once to confirm that Guided Access is enabled.
Yes, a few seconds after a student selects a response, or types their answer, their response will be automatically saved. If a student is disconnected from the test and logs back in, they will be able to resume where they left off.
Open Safari browser and type in http://appstore.hct.ac.ae and click on the HCT logo icon and then Install (do NOT go to the App Store app).
Delete the app completely from the device by holding down on the HCT Assess icon until it shakes and the red cross appears and then click the red cross. Reinstall by following above instructions.
This is caused by inadvertently drawing a circle on the screen when setting up GA. Go back into Guided Access and click on the small cross that appears on the edge of the greyed out area.
Just click Resume instead of Start in the top right corner.
Check that student has selected the right course (Final Assessment Course FWA) NOT the regular English course.
Supporting Technologies:
UPDATE: April 2014 Release Notes
The following link/s serve as a standard reference point for our campus admins/Ed Tech & IT support staff with regards the April 2014 release:
http://help.blackboard.com/en-us/Learn/9.1_2014_04/Administrator/020_Browser_Support (Java version information is also available on this page)
Additionally, they also have a Browser Support Policy that can be found here:
http://help.blackboard.com/en-us/Learn/9.1_2014_04/Administrator/020_Browser_Support/020_Browser_Support_Policy
As highlighted in Blackboard’s ‘Browser Support’ page, please note:
1. Some configuration options for Internet Explorer might make some features of Blackboard Learn difficult to use. To learn more about this please visit:
http://help.blackboard.com/en-us/Learn/9.1_2014_04/Administrator/020_Browser_Support/030_Browser_Support_IE_Issue
2. Safari for Windows is unsupported. Apple’s continued support for this browser is unclear, and Blackboard does not test it.
The Ed Tech department recommends Firefox as the default browser for HCT faculty and students using Bb Learn.
Download other administrator/support walk through guides here:
- 01 – Fix for Copy Function Not Working in-Firefox and Chrome
- 02 – Course Entry Point Issue – Error while going inside the course
- 03 – Fix for the Course Menu displaying Black in a Course
- 04 – Crosslisting eText Courses
- 05 – Enroll Users of Other Campus Node into your Campus Courses
- 06 – Hide Grade Column for Student Under the MyGrades Tool
- 07 – Bringing back the Course Menu which is Disappeared in the course
- 08 – Manual Crosslisting
- 09 – Manual De-crosslisting
- 10 – Resetting Student Submission for Assignment
- 11 – Resetting Student Submission for Quiz
- 12 – Setting up Quizzes for Respondus Lockdown Browser
- 13 – Batch Enroll Users
- 14 – Respondus Server Setup
- 15 – Respondus Quiz Export for Manual Uploading to Blackboard
- 16 – Respondus Standard Format for Importing Questions
- 17 – Respondus Importing Questions
- 18 – Course Catalog for Self Enrollment
- 19 – Guide to Print Students Attempt for Blackboard Quiz
- 20 – Guidelines to Download the Quiz Results for All Students Attempts
- 21 – Respondus – Quiz Export to Word
- 22 – Smart Views in Grade Center – Cross Listing (Click here to watch the instructional video)
- 23 – Guide to Grade Students Attempt in BBLearn FWA Exam
- 24 – Guide to create Smart view based on CRN/Campus in BBLearn Course Grade Center
- 25 – Guide to Generate PDF for the Student Attempt for BBLearn Quiz